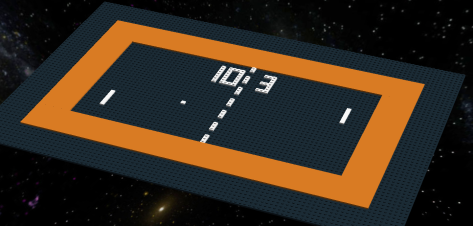
Pong with SketchUp Make 2016


Hi there!

Another one around this “Pong” project that I am working on for a little while now.
My students using SketchUp 2016 rather than Blender, I thought it would have been a good idea to do the Pong pitch with this app as well. So here we are.

PongSketchup.jpg

Not much more to say about it. If you’d want to review the other ones though, here are the links:
With Lego Digital Designer
With Blender

And dont hesitate to rate, like, comment, share, and subscribe)
Take care!
Pascal

Pong with Lego Digital Designer


Hi there,

Another way to illustrate our work with Pong would be with Lego Digital Designer.
Here is what you can get with very little effort:
Pongillustration.pngThis was made with Lego Digital Designer 4.3 that you can get for free here.

I have used the Extended bricks library (The ones that are red), in order to be able to select the black color later on (for the larger plates).
The game is surrounded by an orange layer the same way that I did previously with Blender(You can check this out here).
Notice that I have chosen flat tiles for the pads, the ball and the orange rectangle.
By the way, this model cannot actually be built because nothing comes to stick the large black plates together. The purpose was only to make a png image out of it.

That’s all for now, please comment, like, subscribe, share…)
Take Care!


Tribute to Pong with Blender


Hi there,
Another short article about my work with Blender.
This time I have tried to do things on my own (without the help of any tutorial), and as expected the result is not as awesome as the two previous projects (here and there), but still, not to bad for a restart with the tool.

As I am working on several projects around Pong Original (with Lego Designer, SketchUp, Scratch..), I thought it would have been great to try to do something with Blender as well.
The plan was also to get my students inspired, so they can finish and deliver something by the end of spring holidays.

Regarding my own stuff, here is how it looks like:

Inside Blender:
Pongv2InPaint.png

Render:
pongLethargicDogv2

The challenge was with the lights and materials here. I am not 100% happy with the outcome but I didn’t want to spend the whole day on it, so here it is.
As always, feel free to comment, subscribe, like, share…

Take Care.
Pascal

Another classic 3D Model: The Alarm Clock


Hi there!

Still having lots of fun with blender here. Just wondering why I have left this amazing app for so long…
Step 2 of my “back on track” journey (step 1 here), I have decided to follow another tutorial for drawing an alarm clock this time. Here is below one screenshot when I was half way through it:

Clock Step 1

What makes me feel rather good is the fact that I am remembering how to use Blender, quickly and easily, and I should pretty soon be able to make my own models for my Unity games.
This Blender app is a bit intimidating at first, but when you finally see the results that you can get, it is really rewarding:

AlarmClockLethargicDog1.png

If you compare this final image to the Tutor4u tutorial, you will probably notice that I have customized it a little. The PNG image for the numbers is done with a different font, and I have rotated the hand to show 11:11, which has btw been obtained by rotating the hours hand by 30 degrees anticlockwise and the minutes hand by 66 degrees clockwise.
FYI, I have used Inkscape 0.91 for the texture image and the “Broadway” font. Also Blender is version 2.77 and I have selected “Cycles Render”.

Once again thank you so much to Tutor4u, for the tutorial that I have used. I would recommend his channel and you can find part 1 of this very tutorial right here.

(Please Comment, Share, Subscribe and Like…)
Take Care.

Pascal


The Coffee Cup, the “Hello World” of Blender!


Hi there,
Now I have updated my computer, I am trying to catch up with all the softwares I have left aside for years.  My last drawings were about my unfinished 3D Game, here is a sample pic below:

Travail sur 2 facettes pour placer les axes de rotation
Talking about Blender, it’s been a while since I even launched it,  then I have decided to go back to square one and start all over again with a basic tutorial.
On the same line with a complete programming newbie who will be able to program his first text message to appear on the screen, the well known “Hello World”, it seems that the very first 3D model that you are supposed to draw when you discover a new 3D app is a coffee cup. Then there it is!

CupInBlender.png

Yep, I admit it, kind of ugly in the 3D window of Blender. But if you ask for a rendered image, with shading, lights and stuff, it looks much much more awesome. Check this out!

coffecupLethargicDog1.png

Before to finish this post, I would like to thank Tutor4u for his great YouTube tutorial that you can find here.
Now this is all I wanted to show you today. A new LethargicDog Geek Challenge will come with a similar project. Stay tuned for more.

(Please Subscribe, Comment, Like, Share…)
Take Care.
Pascal.


Bed Table Project


Hi there,

I am working on a Bed Table Project for 140mm wide beds.
I have looked for such a table for a little while, but all models that I have found so far are too narrow and you can use them only on one side of the bed, but not in the middle. Reason is that the legs are not large enough for the table to be set in the middle of the bed.

I have worked on two different models. The first one is a table that you can put directly on the bed, see pic:
Support PC de lit v1

The second one is a more traditional model, and I haven’t decided anything yet:
Support PC de lit v2

The design is a rough first version, as a proof of concept. I will get much more into details when I have chosen between the two. Feel free to drop a comment to help me decide which one I should build and why.
That’s all for now.
Take care.
Pascal


Roue Electrique. Consignes de Sécurité.


(in french)

Salut,
Je roule depuis 10 jours avec une roue Ă©lectrique (ou E-Wheel ou SBU pour Self-Balanced Unicycle ou EU pour Electric Unicycle), bref…
Franchement, pour le moment, c’est que du bonheur, et j’espere pouvoir bien en profiter maintenant que les beaux jours arrivent. A ce propos, je travaille actuellement sur un compte-rendu dĂ©taillĂ©, et aussi un film original, assez diffĂ©rent de ce que l’on a pu voir jusqu’Ă  prĂ©sent sur le net.

Petit bĂ©mol Ă  tout ça, avec mon job de prof, je croise des centaines d’Ă©lèves tous les jours, et je voudrais ĂŞtre sur d’avoir bien Ă©tĂ© entendu et compris sur le sujet de la sĂ©curitĂ© pour un tel engin. En effet, et contrairement aux petits overboards que l’on voit partout, les E-Wheels ne sont pas DU TOUT recommandĂ©es pour les mineurs, ni sur la voie publique, ni sur les trottoirs. Je vous propose donc une petite note de sĂ©curitĂ© synthĂ©tique ci-dessous pour celles et ceux qui sont intĂ©ressĂ©(e)s par le sujet.

E-Wheel: Avertissement pour les enfants et ados!
Ce genre de monocycle intelligent, automatisĂ© et auto-Ă©quilibrĂ© n’est pas si simple Ă  chevaucher de prime abord.
Prévoyez au moins 20 minutes pour vous y faire.
Et il est recommandĂ© (obligatoire?) d’être sous la supervision d’un adulte pour en faire, et de rester loin des routes ouvertes Ă  tout prix.
Assurez-vous également de porter un équipement de sécurité adapté pour protéger votre tête, vos poignets, coudes et genoux. Des chaussures de basket (ou équivalent) sont fortement conseillées afin de protéger vos chevilles de bleus et des coupures diverses.
VoilĂ  pour l’essentiel. En outre, une notice est jointe avec la roue, et il est vraiment utile de la lire Ă©galement. Le bon sens et l’extrĂŞme prudence sont aussi vivement conseillĂ©s.
Une petite illustration video ici pour bien comprendre de quoi il en retourne.
Take Care.
Pascal.
Stencyl : Latest (bad) News


Hi there,

Just for you to know, tonight I feel a little bit disappointed by Stencyl, as I haven’t been able to easily adjust screen resolution to something higher than HD… Everything is shown way too tiny and I cannot see anything actually.
For that reason, I cannot use it anymore on my new laptop and I will uninstall it and port my current projects to Unity3D (even if I will restart them as 2D projects)
If any of you guys have found a nice workaround for that UI issue, please let me know and I might consider to install it again. But for now, I will place all my Stencyl projects on hold until further notice.

Take care.
Pascal