Je viens de laisser tomber Evernote qui était jusqu’à présent ma principale application de prise de notes.
La principale raison, l’application Evernote pour Windows 10 Mobile n’a pas été mise à jour depuis des lustres, et elle contient un nombre de bugs inacceptable.
Entre autres:
Erreurs de synchronisation
Pertes de données
Sauts erratiques du curseur
Gel de l’application..
Non, franchement, plutôt qu’un éléphant, j’aurais choisi une linotte à leur place..
Ce n’est pas tout de faire du beau et du buzz, les outils pro doivent avant tout être fiables et rapides. Efficaces quoi..
Résultat des courses, je viens de migrer toutes mes notes vers Microsoft Office OneNote et pour le moment ce n’est que du bonheur. En plus Microsoft -ayant flairé la faiblesse de son concurrent- propose un outil de migration pour transférer toutes les notes directement depuis Evernote, et il fonctionne plutôt bien puisque j’ai du transférer seulement 5 notes à la main sur un total de 578…
Bref, pour celles et ceux qui auraient vu mes tweets vantant les mérites d’Evernote, vous aurez compris que ça ne risque plus de se reproduire…
J’ai pas que ça à faire que d’attendre des bug fixes qui n’arrivent jamais..
Here is a short message in order to let you know that I have decided to combine Microsoft Word 2016 and Microsoft Access 2016 in order to finish my first E-book.
The main reason for that is my book is made of 16 challenges that are similar in the content, description and presentation, and is supposed to be released in several foreign languages. On top of that, my goal is to produce 16 books of 16 challenges, all of them with the same shape as the first one.
Maybe it will slow me down at first (can’t be worse than now actually), but on the long run, it is supposed to help me to stay organized and on tasks.
Feel free to let me know what you think about it in the comments below. I will reply asap and posts updates when I will be much further down this road.
Please Comment, Share, Rate, Like, Subscribe and don’t hesitate to visit my Google+ and my Twitter as well.
Take Care.
Pascal
Petit coup de gueule aujourd’hui envers nos amis les journalistes professionnels.
Les gars, même si je ne vous mets pas tous dans le même sac, loin de là, je m’insurge aujourd’hui contre vos trop fréquentes erreurs de chiffres dans vos articles.
Je voudrais une fois pour toutes que vous compreniez, que un million c’est mille fois moins qu’un milliard, que 3% et 0.03% c’est 100 fois plus, etc…
C’est important, et ça change complètement le fond du propos, la preuve ci-dessous dans un commentaire que je me suis permis d’ajouter sur un article Yahoo/Le Figaro à propos de l’école 42 de Xavier Niel: (Accessible ici ou là)
Pascal il y a 38 minutes
A nos amis journalistes, 1 milliard ne peut pas être 6% du PIB des USA !!! Et très loin de là en plus.. Les erreurs de chiffres arrivent trop souvent dans la presse, ce qui décrédibilise complètement le propos, c’est dommage. Allez, une petite remise à jour niveau collège en maths, ça peut pas faire de mal. 😀
Répondre
00
Pascal il y a 8 minutes
Et autant 6% du budget des USA est un chiffre astronomique, autant 0.006%(la valeur que vous auriez du trouver), ne me fait pas relever la nuit, et ne mérite plus d’être mentionné dans votre papier. Vous voyez?
En effet, lorsqu’il est écrit e-5 sur la calculatrice, c’est qu’il faut déplacer la virgule de 5 crans, ce qui fait 100.000 fois moins…
Et même en remultipliant par 100 pour avoir le pourcentage, on reste loin du compte… Un millième de 6% en réalité. Calcul: (1.16/18.000)*100=0.006%
Allez, sans rancune, personne n’est parfait.
Et surtout n’hésitez pas à commenter en guise de droit de réponse 😉
Take Care.
Pascal.
Hi There,
This post is about a tutorial that I have found on YouTube on how to build a roof with Lego. The author of this great tutorial is JAYSTEPHER. I highly recommend you to subscribe to his channel, as he is providing great advice on building amazing Lego stuff.
His tutorial consist of showing us how to build a roof with actual (real) lego bricks, but the purpose of my post today is to suggest that you can build that roof with Lego Digital Designer instead. (LDD is available for free download here).
FYI, it seems that Lego will not provide any further updates for LDD, but the latest version (4.3) is still amazing.
The way I have proceeded is quite simple and there is nothing unusual here. I just ran both LDD and JAYSTEPHER YouTube Video Tutorial (Available here), and I followed his construction step by step, pausing his 17 mn video as often as needed in order not to forget any details. After an hour or two (took much longer that necessary because I took snapshots of my work in progress in order to make this very post, and I tried to compare his part list – available in his video comments – to mine – available down below and also with my own building instructions, ZIP file available for download here)
This slideshow requires JavaScript.
If you’re interested to try to build it by yourself, I highly suggest to open both JAYSTEPHER Video, this very post, and my building instructions, so then you have multiple source of information to reach your goal. This might be particularly useful because the author of the tutorial had to move some pieces of the larger window, and as he did not record the video again just for that, my own building instruction might be helpful there. Or you might just be interested it the Parts List below:
For once I have provided a more intricate work here, combining a tutorial, many screenshots, and the building instructions available for download from my google drive, so I would be particularly glad if some of you guys comment this post. Would it be for questions, or to help me improve my writing (as you probably have noticed I am not native English), or even for other remarks, on how it has been useful to you or not, and if you are interested in some more content of that kind)
That’s all for now, I really hope you enjoyed this post as much as I did preparing it. Feel free to share, subscribe, like and comment, and for even more content about Lego, Game Design, 3D and other fun stuff, check my Google Plus account here)
Take Care!
Pascal
Just a quick message here to all of you guys making Vlogs, YouTube Videos, Vine and stuff.
Please never forget that not 100% of your audience will be native speakers. Because of that, anyone making movies would keep in mind that the clearer the voice is, the better us foreigner will understand what you say.
So please avoid to set the background audio/music/surround too loud, it is pretty annoying if you ask me.
Thanks for your attention,
That’s all for now.
Take Care.
Pascal
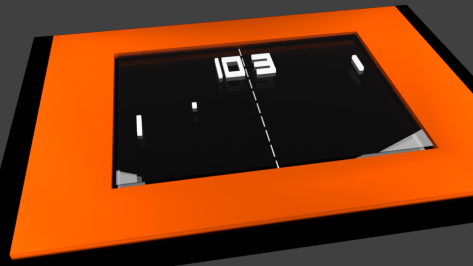
Another one around this “Pong” project that I am working on for a little while now.
My students using SketchUp 2016 rather than Blender, I thought it would have been a good idea to do the Pong pitch with this app as well. So here we are.
Another way to illustrate our work with Pong would be with Lego Digital Designer.
Here is what you can get with very little effort: This was made with Lego Digital Designer 4.3 that you can get for free here.
I have used the Extended bricks library (The ones that are red), in order to be able to select the black color later on (for the larger plates).
The game is surrounded by an orange layer the same way that I did previously with Blender(You can check this out here).
Notice that I have chosen flat tiles for the pads, the ball and the orange rectangle.
By the way, this model cannot actually be built because nothing comes to stick the large black plates together. The purpose was only to make a png image out of it.
That’s all for now, please comment, like, subscribe, share…)
Take Care!
Hi there,
Another short article about my work with Blender.
This time I have tried to do things on my own (without the help of any tutorial), and as expected the result is not as awesome as the two previous projects (here and there), but still, not to bad for a restart with the tool.
As I am working on several projects around Pong Original (with Lego Designer, SketchUp, Scratch..), I thought it would have been great to try to do something with Blender as well.
The plan was also to get my students inspired, so they can finish and deliver something by the end of spring holidays.
Regarding my own stuff, here is how it looks like:
Inside Blender:
Render:
The challenge was with the lights and materials here. I am not 100% happy with the outcome but I didn’t want to spend the whole day on it, so here it is.
As always, feel free to comment, subscribe, like, share…
Still having lots of fun with blender here. Just wondering why I have left this amazing app for so long…
Step 2 of my “back on track” journey (step 1 here), I have decided to follow another tutorial for drawing an alarm clock this time. Here is below one screenshot when I was half way through it:
What makes me feel rather good is the fact that I am remembering how to use Blender, quickly and easily, and I should pretty soon be able to make my own models for my Unity games.
This Blender app is a bit intimidating at first, but when you finally see the results that you can get, it is really rewarding:
If you compare this final image to the Tutor4u tutorial, you will probably notice that I have customized it a little. The PNG image for the numbers is done with a different font, and I have rotated the hand to show 11:11, which has btw been obtained by rotating the hours hand by 30 degrees anticlockwise and the minutes hand by 66 degrees clockwise.
FYI, I have used Inkscape 0.91 for the texture image and the “Broadway” font. Also Blender is version 2.77 and I have selected “Cycles Render”.
Once again thank you so much to Tutor4u, for the tutorial that I have used. I would recommend his channel and you can find part 1 of this very tutorial right here.
(Please Comment, Share, Subscribe and Like…)
Take Care.
Hi there,
Now I have updated my computer, I am trying to catch up with all the softwares I have left aside for years. My last drawings were about my unfinished 3D Game, here is a sample pic below:
Talking about Blender, it’s been a while since I even launched it, then I have decided to go back to square one and start all over again with a basic tutorial.
On the same line with a complete programming newbie who will be able to program his first text message to appear on the screen, the well known “Hello World”, it seems that the very first 3D model that you are supposed to draw when you discover a new 3D app is a coffee cup. Then there it is!
Yep, I admit it, kind of ugly in the 3D window of Blender. But if you ask for a rendered image, with shading, lights and stuff, it looks much much more awesome. Check this out!
Before to finish this post, I would like to thank Tutor4u for his great YouTube tutorial that you can find here.
Now this is all I wanted to show you today. A new LethargicDog Geek Challenge will come with a similar project. Stay tuned for more.
(Please Subscribe, Comment, Like, Share…)
Take Care.
Pascal.


 This was made with Lego Digital Designer 4.3 that you can get for free